Air bags are one of those tool systems that doesn’t get used much, but when you need it, you need it. This powerful system takes a bit of training to master and, over time, some folks have developed “rules” for air bags; most are not needed and overly complicate this simple tool system.
This article will debunk some of these rules, explain why the system works the way it does, and show how to get the most out of it. The high-pressure air bags we will discuss are the thinner, heavy bags that operate, depending on which brand you have, at 118 to 150 pounds per square inch (psi).
High-pressure air bags offer the following advantages: They fit in tight spaces, are rugged, provide a fast lift once assembled, and have a wide range of lifting capacity. Disadvantages include limited lift height, inherently unstable, not readily field repairable, many parts to assemble, diminishing power curve, and limited life span.
Air Bag Math
Air bags get their lifting capacity from a simple principle: The surface area of the air bag multiplied by the psi used to inflate the air bag equals the lifting capacity. A 12-inch × 12-inch air bag with its surface area of 144 square inches multiplied by 150 (the psi of air used to inflate the bag to its maximum capacity) provides a lift of 21,600 pounds, or 10.8 tons. This assumes the object being lifted is in full/flat contact with the bag.
- 12 square inches × 12 square inches = 144 square inches of bag.
- Operating pressure for this example is 150 psi.
- 144 square inches × 150 psi = 21,600 pounds.
- The square inch units canceled each other out, leaving only pounds that we are capable of lifting.
- Air bag capacity is often only listed in tons: 1 ton = 2,000 pounds.
- 21,600 divided by 2,000 = 10.8 tons.
However, this is only practical for the first inch of lift, because as the air bag inflates and rounds out, it quickly loses surface area (contact) and thereby capacity. This is referred to as the “diminishing power curve.” The lifting capacity of the air bag decreases as the lifting height increases because there is less contact with the bag. During the lifting process, the air pressure and lift height are increasing while the contact area between the bag and the object is diminishing, which results in decreasing lift capacity. Therefore, the maximum force can only be counted on at the beginning of inflation, which is roughly about the first inch of lift while there is still maximum surface area in contact with the load. This diminishing power can be charted, height vs. capacity, and these charts can often be found in your air bag manual.

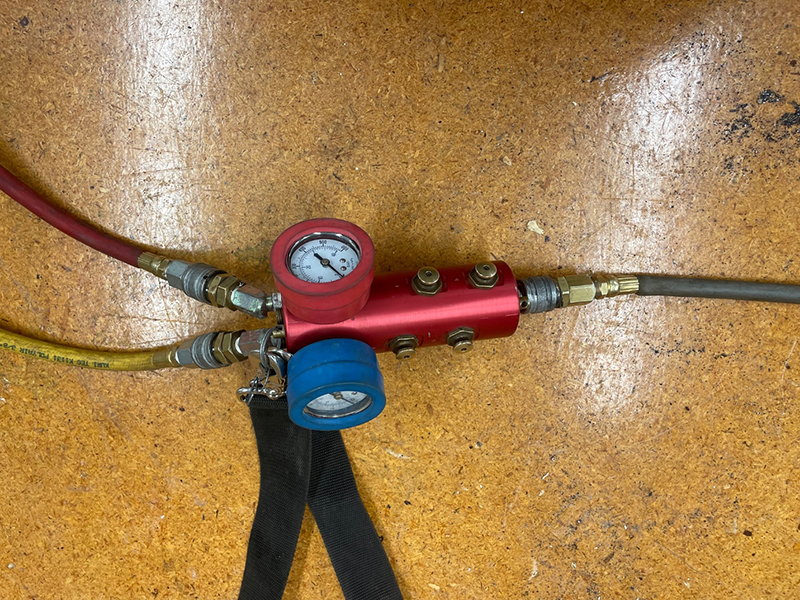
1 An air bag controller with a “T” adapter and pressure relief valves with shutoffs connected. This gives the operator the flexibility to inflate two bags simultaneously and to close off the valves and disconnect hoses, keeping the bags protected with the pressure relief valve. (Photos by author.)

2 Another air bag myth: The lift capacity of stacked bags is limited to the smaller-capacity bag. This is often explained incorrectly; the larger-capacity bag on the bottom has not lost any capability by the placement of the smaller bag on top. It will still lift as rated. If the load exceeds the capacity of the smaller/top bag, then you are limited. Simplify the application by using a matched set of bags.
Many air bags and pneumatic tools will use bar as a unit of (metric) measure. One bar is a measure of atmospheric pressure that is equal to the pressure felt at sea level on Earth. One bar equals 14.5 psi (about 1 atmosphere). To convert bar to psi, number of bar × 14.5 = psi. For example, for an air bag kit that has a maximum rated pressure of 10 bar but your regulator only has a psi scale: 10 × 14.5 = 145 psi.
Threats to the Air Bag
The threats to an air bag are heat, chemical, and mechanical damage. Keep truck mud flaps, old fire hose, or pieces of plywood as barriers to sharp objects and heat. Air bags can operate at temperatures between -40°F and 150°F.
Just as important as sizing up and guarding your bag against the threats listed above, you must also size up the ground conditions. The air bag is essentially a “jack.” If the ground is soft, the jack will push into the ground. Therefore, when placing your air bag, smooth out uneven ground, and remove sharp rocks/objects. Place plywood or cribbing under the bag to increase the efficiency of lifting operations.
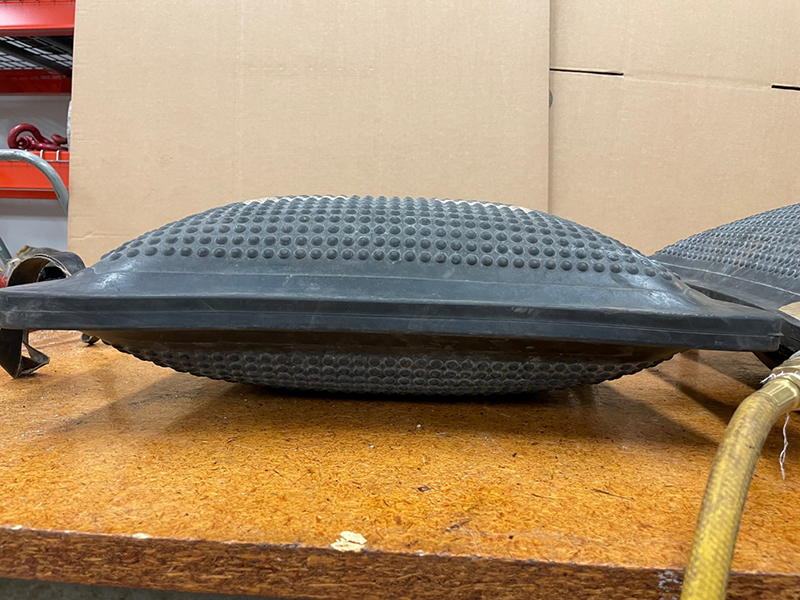
3 Note the lack of “rounding” with this air bag. This is a flat bag designed to be more stable. The flatter shape may also give you greater lift capacity by maintaining more square inches of contact with the object being lifted.

4 Compare this traditional high-pressure air bag shape to photo 3—higher lift but loss in lateral stability and an additional potential loss in lift capacity from the bag rounding and losing contact with the object being lifted.
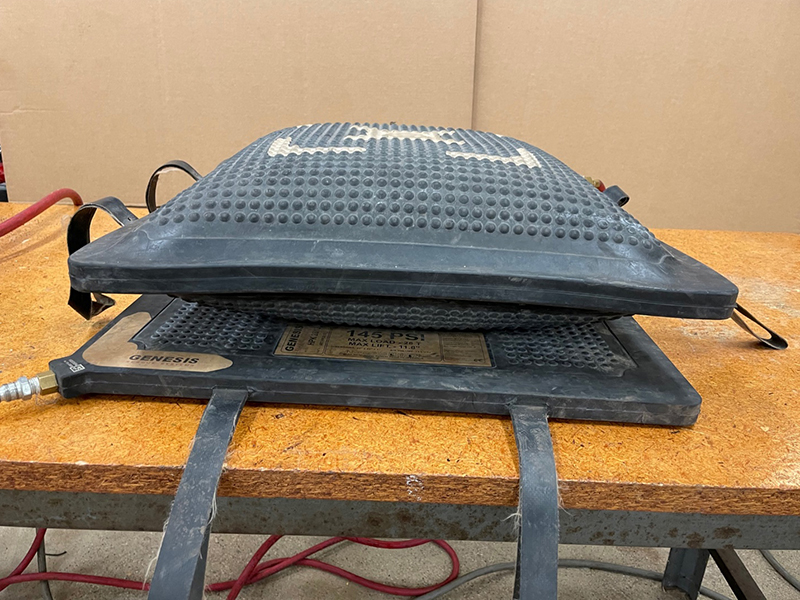
5 Stacked air bags. These air bags are the same size. This is often called a series lift because the bags are in line with each other vertically. Contrary to what some are taught, it does not matter in the least which bag is inflated first, top or bottom. The advantages of stacking bags like this are a uniform fill rate and the height of lift is doubled but the same lift capacity as a single bag. As a rule of thumb, if you have room for two bags, then place two bags. If you need more height, then inflate the second bag. If you are not running a matched set of bags, place the smaller bag on top and inflate the larger bag first. Remember to crib as you lift to capture lift progress.
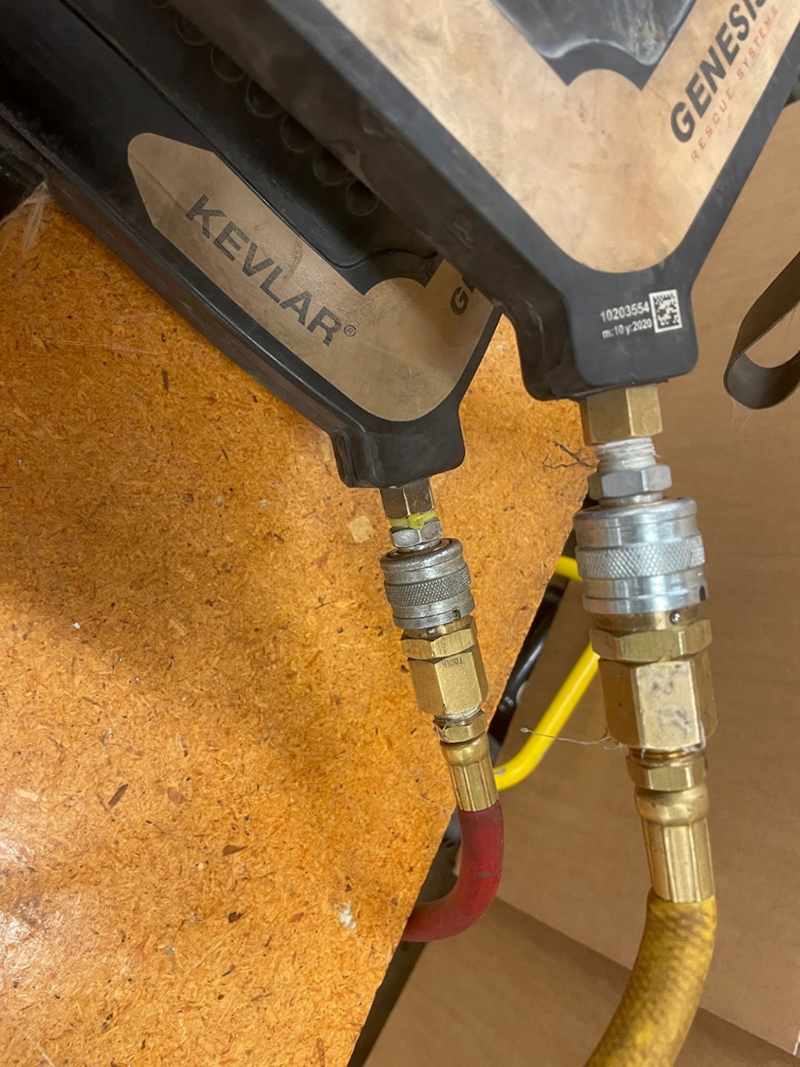
6 Some folks are concerned about the air fittings being oriented together as shown here. This is another myth. It just doesn’t matter. What is important is to understand that as the bags inflate, the position of air fittings changes and they could become pinched. So, place the air fittings that best suits the area they are in so they do not become compromised during the lift.
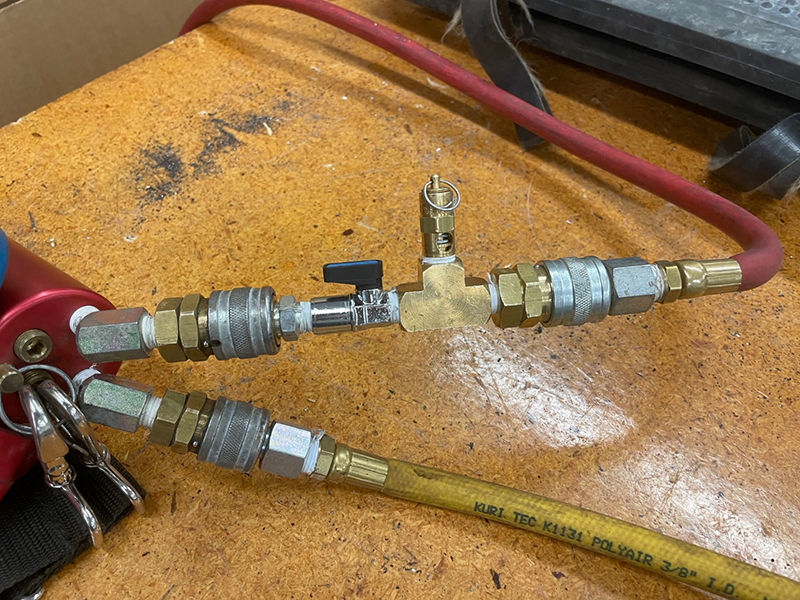
7 Using an inline pressure relief valve with shutoff. If you make your own pressure relief valve with shutoff, size the relief valve 20 to 30 psi higher than the rating of the bag. If you are making a multiple bag lift and have the extra hoses, this set enables you to inflate the bag, shut off the line, disconnect, and reconnect to another hose/bag and still have the protection of a relief valve.
Assembling the System
Have your air bag system stored together ready for field assembly. Lay out the hoses and hardware and connect them together. Once the entire system is together, charge the system with air pressure. Set the output of the regulator to the maximum operating pressure of your air bag system. Turning on the air is the last part of the turning on process and turning off the air is the first step in the disassembly. Turn off the source, which could be an SCBA bottle, a large cylinder off a cascade, or an air compressor. Then, deflate the system by inflating and deflating the bags using the controller until the gauges read zero. Finally, disassemble the system, clean it as needed, inspect it, and put it away.
Lifting Operations
As with any lifting operation, there are three size-up considerations.
Weight of the object. Can you accurately estimate/calculate the weight of the object? Are you lifting the entire object or just tilting it, leaving the ground to support some of the total weight, given diminishing power curve issues vs. the weight of the object to be lifted?
Center of gravity of the object. Can you get under the center of gravity? Keeping your lift as vertical as possible will limit side loading of the bags. If the lifting bag is off center, the load will tilt, placing a side load on the bag and cribbing/struts.
Capacity of your rigging/lifting tools. Are the working load limits of your cribbing/struts capable of supporting the object? The average four-door automobile weighs about 3,500 pounds. A cubic foot of reinforced concrete weighs 150 pounds. Steel weighs 490 pounds per cubic foot. A 35-foot-long school bus weighs about 35,000 pounds, about the same for a city bus. If it’s full of passengers, adjust your weight estimation.
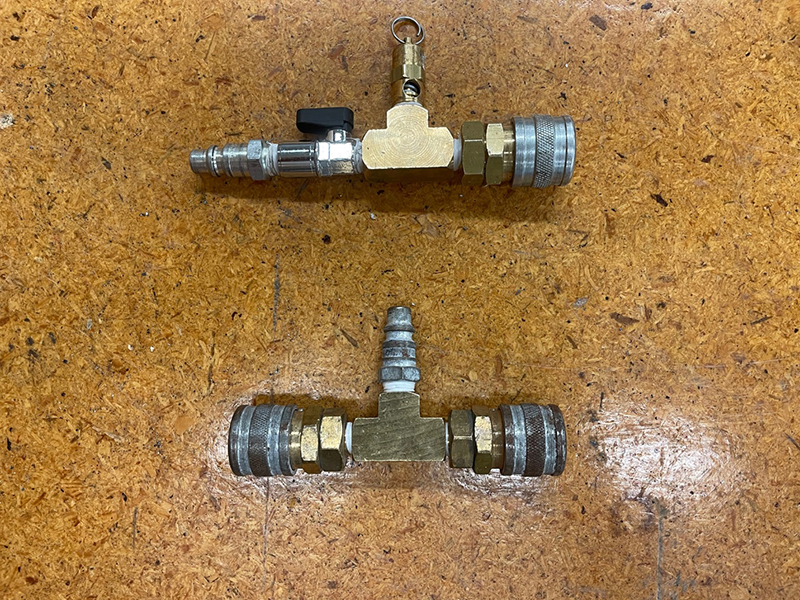
8 Homemade “T” and inline pressure relief with shutoff valve. You can use the pressure relief on either the bag end of the hose or the controller end. If using on the air bag, then getting up close to the bag during the lift operation to shut off the valve may be a bad idea, depending on the stability of the objects being lifted. The pressure relief valve acts like a fuse; if the load shifts or is impacted by a falling object, it will provide a slow release of air and not a sudden failure.

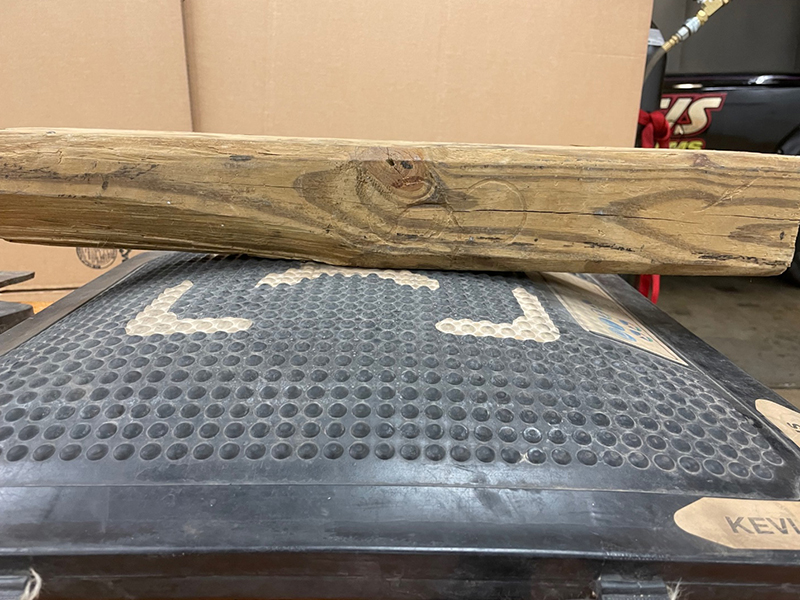
9 Air bags are most commonly damaged by lifting against sharp/penetrating objects, heat (lifting against a catalytic converter as an example), or chemical exposure. Shown here is a mud flap being used as an air bag protector. Many air bags are made out of butyl rubber, the same material used in chemical protective suits, and are resistant to many chemicals. Acids can still damage these bags. Check with your manufacturer if you have a chemical exposure to your bag.

10 The air fittings are ¼ inch pipe thread and will need Teflon tape or other pipe thread sealant to ensure a leak-free connection. Use two wrenches to make the connection, one on the fitting and the other on the bag to prevent twisting and damaging the bag fitting during tightening.

11 12 Two styles of air bag controllers. All are fitted with internal pressure relief valves. When operating the control buttons, resist the urge to “pulse” the lift or inflate button. Many firefighters will just bump the trigger, resulting in rocking the load and possibly causing more injury to a patient. Engage/depress the inflation button as a slow, steady, measured rate of lift; it’s safer for the patient and safer for the dynamics of the lift.
The air bag can be used vertically and horizontally. High-pressure air bags can tip over, be squeezed, and literally shoot out from under the load. Do not consider this system stable. Always be prepared to capture the progress of the lift or spread (with cribbing and/or struts) so that if something does slip, you don’t have to start all over.
Ideally, you should not stack high-pressure air bags, but you often need to. Stacking air bags adds to their lateral instability. Use two stacked bags when the object to be lifted is secured against lateral movement and try not to inflate stacked bags more than two-thirds their maximum height. Always be assessing the amount of side load being applied to the bag and counter this reaction as much as possible with cribbing/struts. The greater the angle/tilt of the object, the more likely the bags could kick out.
Simple Single-Point Lift
In the case of a victim under a passenger car or building component such as a wall or floor section, the entrapping object’s weight is well under the lift capacities of air bags. The object is directly pinning the victim down on the ground/floor. Digging under the victims to free them is not an option.
Crib/stabilize on the downside of the object in two places minimum; this will be the hinge side. These points will prevent the load from shifting during the lift. If the downside is adequately pinned by debris, these crib boxes may not be needed.
Crib around the victim just in case something goes wrong, because something always goes wrong. These points will serve as a progress capture during the lift. If there is enough vertical height, stick in two air bags stacked on top of each other. You don’t have to use both, but you have them in case you need the extra height. Assess the point at which you place the air bags, under the center of gravity, keeping the lift vertical as much as possible and limiting side loads.
So, now you have two to four crib boxes, depending on space available. The crib box nearest the patient will be adjusted in height during the lift. While this cribbing is happening, assemble the air bag system. Protect the bags as needed and lift slowly. It is easy for the air bags to lift faster than folks can crib to capture the lift (lift an inch, crib an inch), so be aware of that and maintain teamwork and coordination of the lift. Wedges are a necessary part of this or any cribbing assignment to fill in all the in-between-sized gaps.
Two-Point Lift
The object pinning the victim is heavy enough to warrant a parallel lift—air bags placed side to side. If you have enough hoses and pressure relief shutoff valves, you can stack two sets of two bags. In this scenario, you are going to lift the entire object, not just tilt it up, creating space to extricate—but lift the whole thing.
Estimate weight and center of gravity. Place the air bags on either side of the center of gravity so it is captured during the lift, keeping the lateral shift risk as minimal as possible. Select points around the object to capture the lift progress, and always crib around the victim.
Big Lifts
When working an overturned metro or school bus, call for a rotator truck or crane immediately, but don’t wait for one. If you are going to apply air bags, be prepared to have multiple lift points and cribbing locations. Also keep in mind you may not have to lift the entire object. Do not use any part of a victim as a fulcrum. Lifting in one area may crush someone located away from the lift. If limbs are entrapped by an aluminum window frame, then cut the frame away. Each trapped person will need a customized rescue. Keep in mind you can tilt an overturned school bus using high-lift jacks.
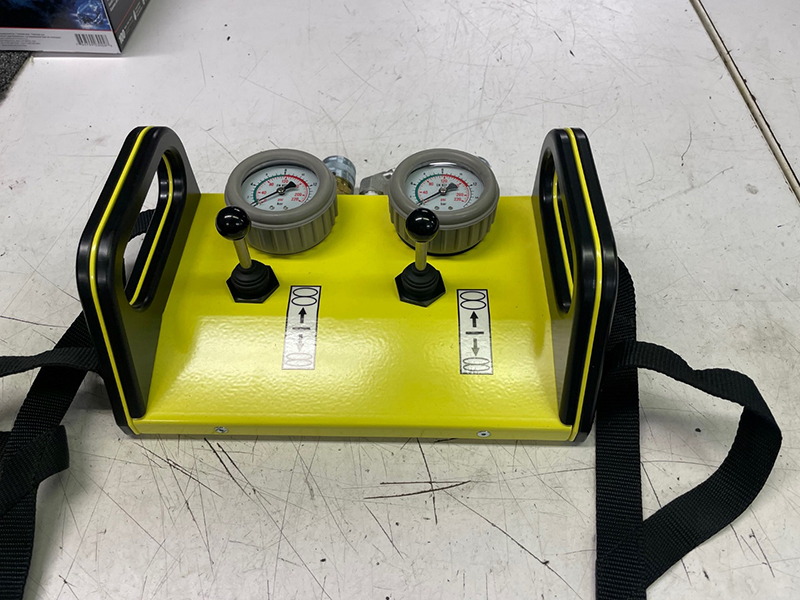
13 A joystick controller. There is no real difference in operating capability between this style and the push-button style. One notable exception is the push buttons are more durable than the joystick. The joystick does give a smoother, slow, steady inflation rate.
14 Note the lack of contact between the rounded bag and the object being lifted. This loss of contact also results in loss of lift capacity (diminishing power curve). So, if you need to lift a 10-ton steel I-beam and you use a 10-ton bag, even if you only need to lift it an inch or two, your bag will not make the lift because of lack of surface contact, which equals less capacity.
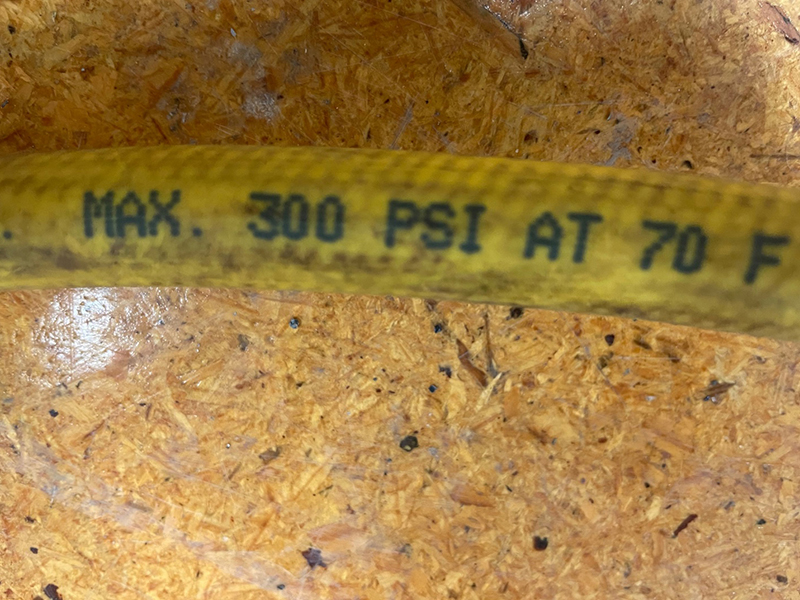
15 Inspect your hoses and fittings for proper ratings and for any physical damage. Wash hose and couplers with soap and water, checking for leaks. Inflate bags to 30 psi and wash with soap and water to find any leaks. Air tool hoses can come in several ratings. Only buy hose that equals the highest air pressure tool system rating you have and a common coupling. That way, if someone mixes up your inventory, you will be OK, or if you damage a hose on scene, you will have a backup.

16 Air bags placed side by side for a parallel lift, designed to give more lift capacity than lift height. When performing a parallel lift, make every effort to use the same size bag. These bags have different inflation rates and can tilt the load and even increase pressure on the patient for a moment unless you have a very skilled operator running the controls. If you do not have two bags of the same size (I recommend two bags in the 25- to 30-ton range), then compensate for the size difference with cribbing.
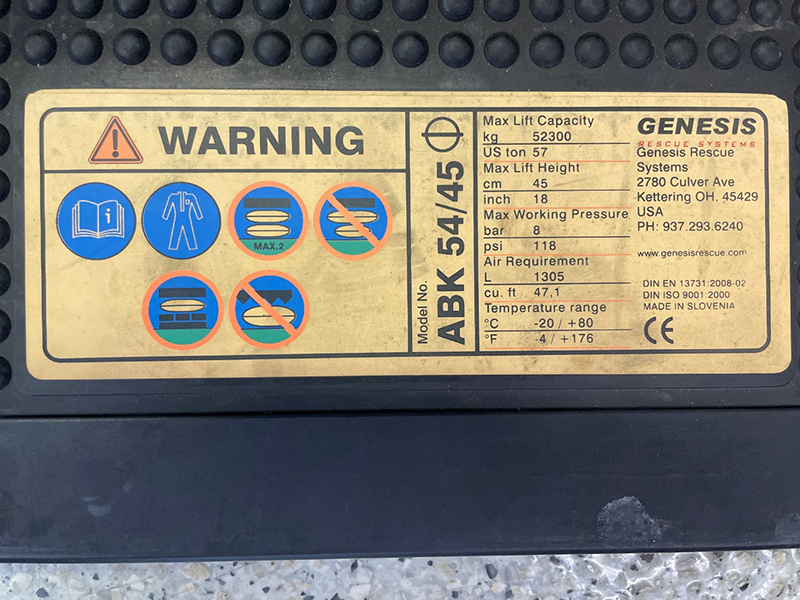
17 This air bag label has lots of good information: capacity and height, maximum air pressure/volume, serial number, date of manufacture, cautions about how to stack bags, and hazards to bags.
Building Crib Towers to Lift Elevated Objects
There will be times when the lift point for your air bags is elevated off the ground. To keep the air bag system efficient, you need to place the air bags in close contact to the object being lifted. Any dead space above the air bag wastes time and air. The answer is to build crib boxes to place the air bags on. The top and bottom layer of the crib boxes should be solid across their span. The cribbing in between should be placed to match the weight of the object being lifted. Use caution if your crib towers approach twice their height, as the crib pieces are long.
Ratcheting the Lift
When the height needed to make the lift exceeds the height of your air bags, even when stacked two high, there is a technique for once your bags have maxed out in height. Set the progress capture crib boxes to fully stabilize the load. Then crib under the air bags, raising them up. Make a solid base on top and bottom. Build the crib box to hold the air bags as close as possible to the object. Any air gap between the air bag and the object to be lifted is inefficient and slows the operation. Proceed with the lift.
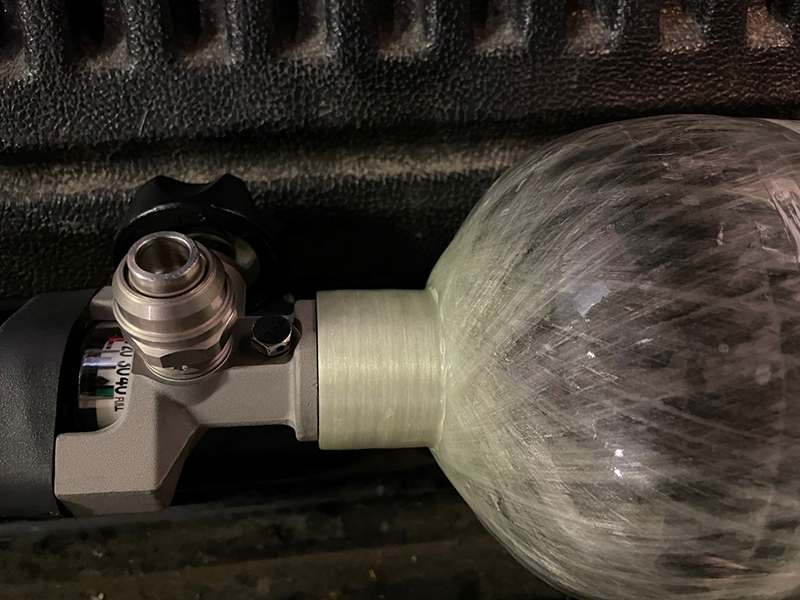
18 Many SCBA bottle manufacturers are using proprietary fittings. Compressed Gas Association (CGA) 347 is the traditional SCBA fitting. Adapters are available.
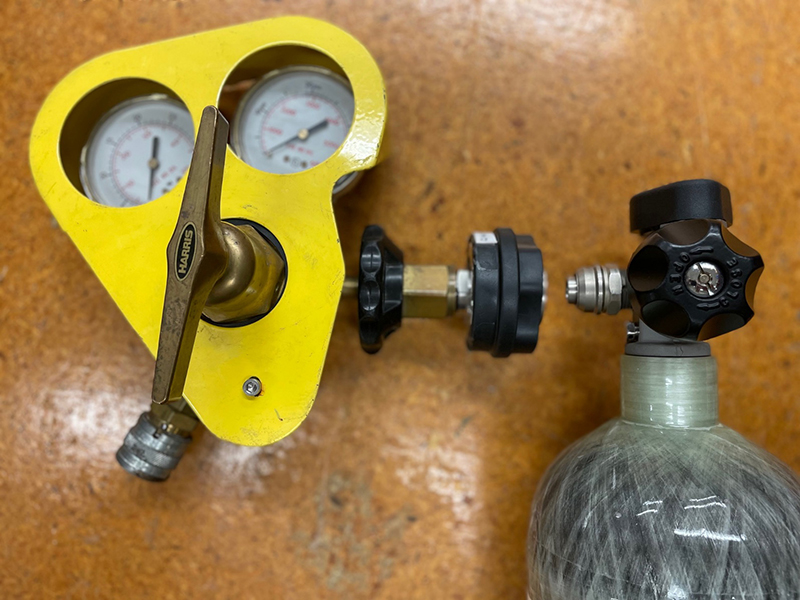
19 An air pressure regulator with a CGA 347 female fitting plus a modern quick connect SCBA adapter.

20 A high-pressure air bag system assembled. Use a black or gray hose as the supply to the air bag controller and get a long supply hose so you don’t drag the bottle and regulator around. Use bright color hoses to feed the bags so in the low light conditions you can call out, “Up on red,” “Down on yellow,” and so on.
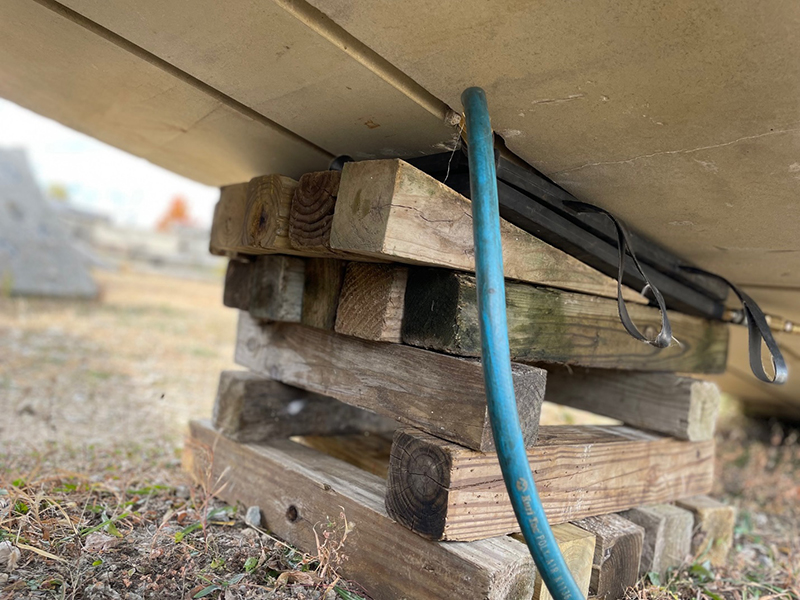
21 Two air bags elevated using a crib box. Note the solid bottom and top layer of cribbing and the tilt of the bags using wedges to develop full contact with the slab. The bags fit the dimensions of the crib box.
Pushing Objects
When the application is to separate two objects, likely with a patient in between, here are some considerations:
- Be prepared for the air bag to fall to the ground when it loses grip.
- Be prepared to prevent the objects from rolling back onto the patient.
- If the bag is pushing above the object’s center of gravity, the object will be driven into the ground and potentially tip over. If pushing below, the object may rock backward into the patient.
- Consider anchoring one side, simplifying the dynamics of the push.
Safety Issues
- Unless specifically recommended by the manufacturer, never stack more than two air bags.
- During the lift, especially when tilting the object or if bags become side loaded, keep people from in front of the bags in case they kick out.
- Never put a female coupling on a tool (trapping pressurized air); it must have a male fitting so pressurized air always bleeds off when it is disconnected. This is a safety issue so the tool does not have stored energy sitting around waiting to unexpectedly discharge.
- The operator should know the system and all pressure requirements.
- Make sure the pressure gauge is matched for the system and observe when the overall bag pressure nears the maximum operating pressure. If it gets close, the operator should stop inflation and inform supervision.
- The controller will have pressure relief valves that release when the bag nears max pressure, preventing overpressurization.
- Do not mix air bags with different operating pressures.
Maintenance
- A high-pressure air bag system needs to be functionally tested at least quarterly. Inflate the bag to 30 psi, hold at this pressure for 10 minutes, and apply a soap and water solution to reveal any leaks.
- Check all hoses/bags for blisters, cuts, burns, and any damage.
- Do not inflate an unloaded bag (a bag not lifting a considerable weight) to look like a basketball. This can damage the interior seams of the bag. If you find a leak around the air inlet connection, bleed off all pressure, remove the fitting, clean the threads, install a new fitting, and retest. If you find a leak anywhere else, it is reason enough to take the bag out of service and return it to the manufacturer for further evaluation.
- When dirt gets into the air fittings, just knock it out and wash with soap and water.
- Check the accuracy of the regulator air gauges against the SCBA bottles; ensure gauge guards are in place.
- Check for the presence of a regulator “O” ring.
- Check gauges on the air bag controller; check that controls operate smoothly.
- Store the pressure regulator with the adjustable “T” handle completely loosened so the spring does not develop a memory.
- Make sure you have in your toolbox a pneumatic adapter kit. In it should be adapters to fit the various types of fittings of mutual-aid companies, including glad hand adapters to run tools off a semi-truck’s air brakes and even a tire valve stem adapter to get energy out of a spare tire.
Air Bag Hydrostatic Testing
Manufacturers list varying life spans for their specific bags; most bags have a shelf life of 10 to 15 years. Manufacturers recommend testing after 3 to 5 years from purchase and every year after 10 years. Check your operations manual for the testing timetable recommended for your system.
Pneumatic failures are violent and sudden; these high-pressure air bags are air vessels not unlike SCBA cylinders. Do not take this for granted, even if you don’t use your bags that often. They still age and need to be factory tested on their schedule.
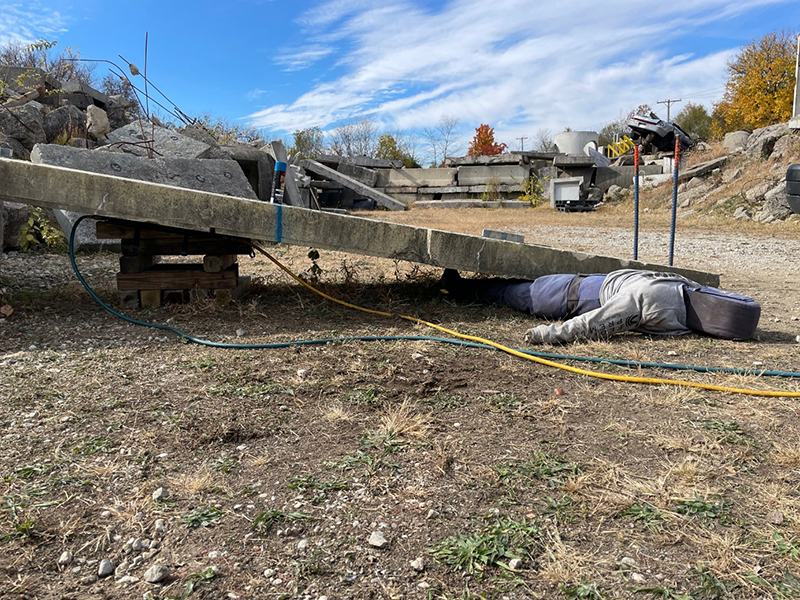
22 A single-point lift. The blue paint strip/green arrow is in line with the center of gravity (CG) of the slab. The air bags are placed to the left of the CG in this example. This will simplify the lift. If you lifted in line with the CG (closer to the patient), it would try to balance the load, creating instability. If you lift to the right of the CG, you could destabilize the high side, causing the load to slip to the right. Pickets driven in on the downside also keep this end stable.
. . .
High-pressure air bags are a great tool. Don’t take them for granted, and don’t wait until someone is trapped to figure out how they work. Don’t buy an air bag kit with one of every sized bag; get a couple of matched sets and maybe a couple of smaller bags (6- × 6-inch). Read the manual for your air bag system and then go train with it.
Steve Shupert is a lieutenant (ret.) from Miami Valley Fire District, Montgomery County, Ohio. He is rescue team manager and training officer for Ohio Task Force #1 US&R. He is a veteran of 11 federal deployments including WTC and Hurricane Katrina, a member of DHS/FEMA Rescue Sub Group, a certified rescue specialist, a structural collapse specialist instructor, and a heavy equipment rigging specialist instructor. Shupert is director of training for Crash Course Village, a 501C3 nonprofit organization.

